Get Free Estimate

Window Well Installation Guide | DIY & Professional Options
Complete Window Well Installation for Light, Access, and Safety

Complete window well installation guide for Toronto homes. Learn about window well types, proper sizing, drainage, costs, and code requirements. DIY instructions and when to hire professionals for basement window wells.
Window Well Installation Guide | DIY & Professional Options in progress
⚠️ Licensed & Insured
⚡ Fast Response
Foundation crack Wall damage Basement leak Structural damage

Why Toronto Homeowners Trust DrySpace

25+ Years in Business
12,847 Projects Completed
$5M Insurance Coverage
24/7 Emergency Response

WSIB Certified

Full workplace safety insurance coverage for all workers

CSA Approved

Canadian Standards Association certified materials & methods

ISO 9001:2015

International quality management system certification

BBB A+ Rating

Better Business Bureau accredited with highest rating

Window Well DIY Installation Guide

Complete guide for DIY window well installation meeting Ontario Building Code. Learn proper sizing, drainage requirements, installation steps, and safety covers. Professional instructions for creating safe, code-compliant basement window wells.

Key Requirements

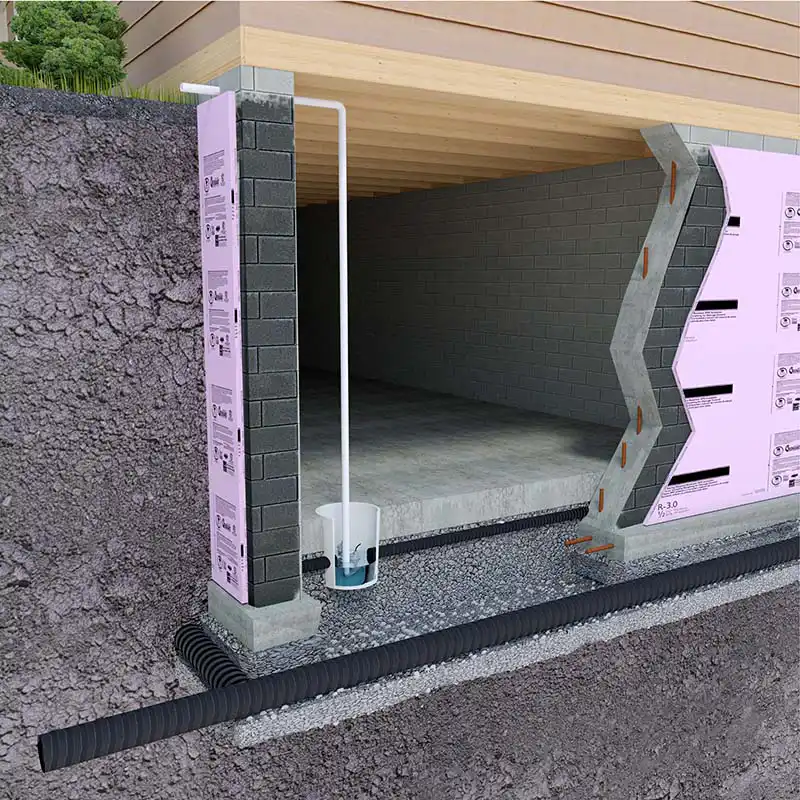
✓ Drainage connection mandatory
✓ Egress wells 760mm projection minimum
✓ Ladder required over 900mm deep
✓ Covers must support 40 lbs/sq ft
✓ Clear stone drainage essential

Service Areas

We provide professional window well installation throughout the Greater Toronto Area. View our complete service area coverage →

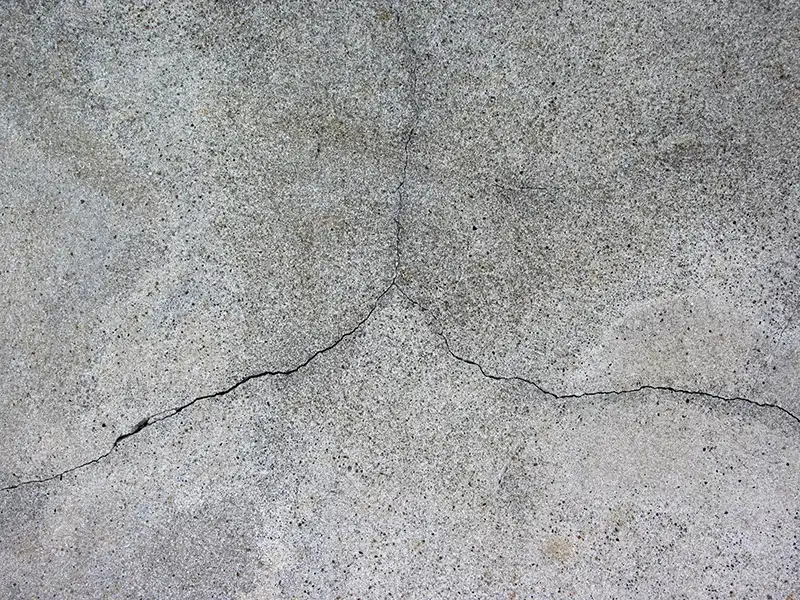
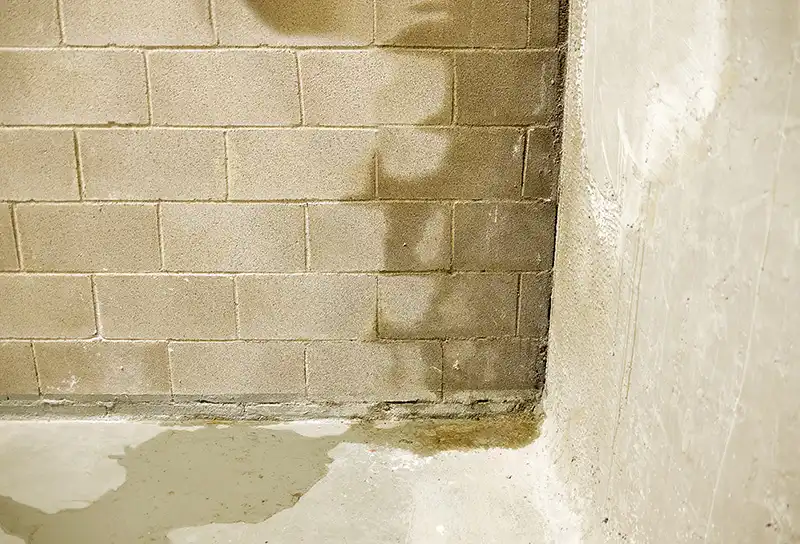
Remember: Window wells without proper drainage are just water collectors against your foundation. Focus on drainage first, everything else second. When in doubt, consult professionals.

Related Services

Complete Solutions for Your Basement

Since we're already working on your basement, consider these complementary services that save time and money when done together.

Window Well Installation - Light, Access, and Safety for Your Basement Window Well Installation - Light, Access, and Safety for Your Basement results

Window Well Installation - Light, Access, and Safety for Your Basement

Window wells are essential features that transform dark basements into livable spaces while providing crucial emergency exits. A properly installed window well brings natural light, ventilation, and safety to below-grade spaces. However, improper window well installation creates water problems, safety hazards, and code violations. Done right, window wells are valuable assets. Done wrong, they become expensive swimming pools attached to your foundation.

This guide provides exact specifications for code-compliant window well installation in Toronto. We’ll cover sizing requirements, drainage essentials, proper materials, and the installation process that keeps water out while letting light in.

Whether you’re creating an egress window for a bedroom or simply want more natural light, proper window well installation is critical for safety, function, and preventing water damage.

Ontario Building Code Requirements Ontario Building Code Requirements results

Ontario Building Code Requirements

Egress Window Wells (OBC 9.9.10)

  • Required for all bedroom windows below grade
  • Minimum 760mm (30") projection from wall
  • Width = window width + 150mm each side minimum
  • Ladder required if depth exceeds 900mm (36")
  • Permanent ladder, not removable
  • Maximum 300mm (12") between rungs

General Window Wells (OBC 9.7.1.3)

  • Minimum clearance for window operation
  • Drainage to weeping tile required
  • Cannot impede window function
  • Must not collect water
  • Proper backfill material mandatory

Well Covers (OBC 9.9.10.1)

  • Must support 1.9 kPa (40 psf) minimum
  • Easy operation from inside
  • Cannot require tools to open
  • Must allow full window opening
  • Transparent or translucent preferred

Drainage Requirements (OBC 9.14.5)

  • Positive drainage mandatory
  • Connect to weeping tile system
  • Or drain to sump pump
  • Gravel base required
  • No standing water permitted

Safety Requirements

  • Wells over 600mm (24") need guards
  • Guard height 1070mm (42") minimum
  • Opening maximum 100mm (4")
  • Secured against removal
  • Cannot impede egress
Planning Your Window Well Planning Your Window Well results

Planning Your Window Well

Critical Pre-Installation Steps

1. Check Local Requirements

  • Some municipalities have additional rules
  • Setback requirements from property lines
  • Permit requirements vary
  • Utility locate mandatory
  • HOA restrictions possible

2. Measure Carefully

  • Window dimensions exactly
  • Distance to grade
  • Foundation wall thickness
  • Existing grade slopes
  • Clearance to obstacles

3. Egress Calculations For bedrooms, minimum opening:

  • 0.35m² (3.8 sq ft) area
  • No dimension less than 380mm (15")
  • Sill height max 1000mm (39") above floor
  • Well sized for full opening
  • Consider person exiting

4. Material Selection

  • Galvanized steel (most common)
  • Composite materials (no rust)
  • Concrete block (site-built)
  • Pressure-treated timber (temporary)
  • Corrugated steel (economical)

5. Drainage Planning

  • Locate existing weeping tile
  • Plan drain connection
  • Consider sump pump location
  • Account for grade changes
  • Winter drainage concerns
Window Well Sizing Window Well Sizing results

Window Well Sizing

Getting Dimensions Right

Width Requirements

  • Window width + 300mm (12") minimum
  • 150mm (6") clearance each side
  • More for casement windows
  • Consider window trim
  • Allow maintenance access

Projection from Wall

  • Standard wells: 400-600mm (16-24")
  • Egress wells: 760mm (30") minimum
  • Deeper for larger windows
  • Account for wall thickness
  • Consider ladder space

Depth Considerations

  • Match window sill to well top
  • Typically 100-150mm (4-6") below sill
  • Maximum 1200mm (48") practical limit
  • Deeper needs engineering
  • Ladder required over 900mm (36")

Area Calculations Egress window wells need room for person to exit:

  • Minimum 9 sq ft floor area
  • No dimension less than 36"
  • Clear path to ladder
  • No obstructions
  • Consider emergency use

Common Sizing Mistakes

  • Too small for window operation
  • Insufficient egress space
  • Too shallow (water entry)
  • Ladder space forgotten
  • Future window upgrades ignored
Excavation Process Excavation Process results

Excavation Process

Safe and Proper Digging

1. Utility Locates First

  • Call before you dig (mandatory)
  • Wait for all locates
  • Hand dig near utilities
  • Mark all services
  • Document locations

2. Layout and Marking

  • Spray paint outline
  • Add 300mm (12") working space
  • Square to foundation
  • Check measurements twice
  • Photo before digging

3. Excavation Steps

  • Remove sod carefully (reuse)
  • Excavate in lifts
  • Slope sides for safety (1:1)
  • Watch for foundation damage
  • Protect window during work

4. Depth Requirements

  • 300mm (12") below window sill
  • Plus 450mm (18") for drainage
  • Total typically 750mm (30") minimum
  • Account for settled grade
  • Allow drain installation

5. Safety Considerations

  • Shore sides if over 1.2m (4')
  • Keep excavated soil back
  • Cover or fence opening
  • Ladder for access
  • Never work alone
Drainage Installation Drainage Installation results

Drainage Installation

The Most Critical Component

Drainage Options Ranked

1. Connect to Weeping Tile (Best)

  • Locate existing drain
  • Core hole through foundation
  • Install sleeve and seal
  • Connect with proper fittings
  • Maintains below-grade drainage

2. Drain to Sump Pump

  • Run pipe to sump pit
  • Maintain proper slope
  • Enter pit above pump
  • Include cleanout
  • Good for retrofits

3. French Drain System

  • Only if no other option
  • Extends 10+ feet from house
  • Below frost line
  • Pop-up emitter ending
  • Risk of freezing

4. Never Acceptable

  • Drain tile to surface
  • Connect to downspouts
  • Daylight near foundation
  • No drainage at all
  • Rely on well only

Installation Process

  1. Create sump: 300mm (12") deep minimum
  2. Add drainage stone: 450mm (18") deep
  3. Install drain pipe: 3" minimum
  4. Slope to connection: 2% minimum
  5. Test before backfill: Critical step
Well Installation Steps Well Installation Steps results

Well Installation Steps

Proper Installation Sequence

1. Prepare Foundation Wall

  • Clean wall surface
  • Repair any cracks
  • Apply waterproofing
  • Install membrane
  • Protect during work

2. Set Drainage Base

  • Level bottom of excavation
  • Compact if disturbed
  • Add filter fabric
  • Place 450mm (18") clear stone
  • Create drainage sump

3. Install Well Unit

  • Test fit first
  • Check level and plumb
  • Secure to foundation
  • Use concrete anchors
  • Seal wall connection

4. Attachment Methods

  • Masonry anchors for concrete
  • 75mm (3") minimum embedment
  • 300mm (12") spacing maximum
  • Seal all penetrations
  • Galvanized fasteners only

5. Waterproofing Connection

  • Membrane behind flange
  • Seal with mastic
  • Overlap 150mm (6") minimum
  • No gaps or voids
  • Test with hose
Backfilling and Grading Backfilling and Grading results

Backfilling and Grading

Ensuring Proper Drainage

Backfill Materials

  • Inside Well: Clear stone only
  • Outside Well: Free-draining soil
  • Never Use: Clay or organic material
  • Top Layer: Topsoil for landscaping

Backfilling Process

  1. Continue clear stone: To 150mm (6") from top
  2. Add filter fabric: Prevents soil infiltration
  3. Place gravel layer: 50mm (2") transition
  4. Backfill outside: In 200mm (8") lifts
  5. Compact each lift: Prevent settling

Grading Requirements

  • Slope away from well
  • 2% minimum grade (1/4" per foot)
  • Extend slope 1.5m (5’) minimum
  • Higher than surrounding grade
  • Account for settling

Common Mistakes

  • Negative grade toward well
  • Clay backfill (holds water)
  • Insufficient compaction
  • No filter fabric
  • Poor drainage stone

Final Grade

  • Well lip 75-100mm (3-4") above grade
  • Smooth transition
  • No water pockets
  • Positive drainage
  • Matches landscaping
Ladder Installation Ladder Installation results

Ladder Installation

Required for Deep Wells

When Required

  • Wells deeper than 900mm (36")
  • All egress window wells
  • Recommended for all wells
  • Better safe than sorry
  • Code requirement clear

Ladder Specifications

  • Permanent installation
  • 300mm (12") rung spacing maximum
  • 300mm (12") width minimum
  • Rungs minimum 16mm (5/8") diameter
  • Project 75mm (3") from wall

Installation Options

1. Integrated Ladders

  • Built into well unit
  • Factory spacing correct
  • Strongest option
  • Most expensive
  • Best for egress

2. Bolt-On Ladders

  • Separate ladder unit
  • Flexible positioning
  • Galvanized steel
  • Secure attachment critical
  • Check weight rating

3. Site-Built (Avoid)

  • Difficult to meet code
  • Rust concerns
  • Attachment challenges
  • Inspection issues
  • Last resort only

Safety Requirements

  • Support 200 lbs minimum
  • Non-slip rungs
  • Secure mounting
  • Clear path to top
  • Regular maintenance
Window Well Covers Window Well Covers results

Window Well Covers

Protection and Safety

Cover Requirements

  • Support 40 lbs/sq ft minimum
  • Open easily from inside
  • No tools required
  • Allow emergency egress
  • Fit properly

Cover Types

1. Polycarbonate (Best Overall)

  • Clear for light transmission
  • Strong and lightweight
  • UV resistant
  • Custom sizes available
  • $200-500 typical

2. Metal Grates

  • Maximum ventilation
  • Security option
  • Heavy duty
  • Let in rain/snow
  • $150-400 range

3. Bubble Covers

  • Good rain protection
  • Insulation value
  • Less light transmission
  • Standard sizes only
  • $100-300 cost

Installation Tips

  • Hinges on house side
  • Adjustable supports
  • Proper water shed
  • Secure when open
  • Lock options available

Safety Considerations

  • Children/pet falls
  • Snow load capacity
  • Emergency operation
  • Regular testing
  • Clear instructions posted
Common Installation Mistakes Common Installation Mistakes results

Common Installation Mistakes

What Goes Wrong

Drainage Failures

  • No drainage system (floods guaranteed)
  • Drain connected to nothing
  • Negative grade into well
  • Clogged with dirt/debris
  • Frozen drain lines

Sizing Errors

  • Too small for window operation
  • Insufficient egress space
  • Too shallow depth
  • Ladder space forgotten
  • Future needs ignored

Installation Problems

  • Poor wall attachment
  • No waterproofing
  • Wrong backfill material
  • Inadequate compaction
  • Missing filter fabric

Code Violations

  • No ladder when required
  • Improper cover strength
  • Blocked egress path
  • Insufficient size
  • No drainage provision

Water Problems

  • Negative grade
  • Clay backfill
  • No drainage
  • Poor waterproofing
  • Clogged drains
Maintenance Requirements Maintenance Requirements results

Maintenance Requirements

Keeping Wells Functional

Spring Maintenance

  • Remove winter debris
  • Check drain function
  • Test cover operation
  • Inspect ladder security
  • Clear drainage stone

Fall Preparation

  • Clean all debris
  • Test drainage system
  • Lubricate hinges
  • Check weather seals
  • Prepare for snow

Annual Inspection

  • Wall attachment secure
  • No rust/deterioration
  • Drainage functioning
  • Cover operates properly
  • Ladder stable

Common Problems

  • Leaves clogging drains
  • Rust on metal wells
  • Loose attachments
  • Cover damage
  • Settling/movement

When to Replace

  • Severe rust/holes
  • Detached from wall
  • Inadequate size
  • No drainage possible
  • Safety concerns
DIY Cost Analysis DIY Cost Analysis results

DIY Cost Analysis

Budget Breakdown

Materials Cost

  • Window well unit: $150-500
  • Drainage stone: $100-200
  • Drain pipe/fittings: $50-100
  • Fasteners/sealants: $50
  • Window well cover: $150-400
  • Total Materials: $500-1,250

Tool Rental

  • Mini excavator: $300/day
  • Or hand digging: Your labor
  • Concrete drill: $50/day
  • Compactor: $75/day
  • Safety equipment: $50

Hidden Costs

  • Utility locates: Free but time
  • Disposal fees: $100-200
  • Permit costs: $150-300
  • Waterproofing: $100-200
  • Mistakes/repairs: Variable

Professional Installation: $1,500-3,000

DIY vs Professional

  • DIY saves $1,000-1,750
  • Requires 2-3 days work
  • Physical demands high
  • Mistakes costly
  • No warranty
When to Hire Professionals When to Hire Professionals results

When to Hire Professionals

Recognizing Limitations

Hire Professionals When:

  • Foundation needs repair first
  • Complicated drainage required
  • Multiple wells needed
  • Structural concerns exist
  • Physical limitations

Red Flags to Stop DIY:

  • Foundation cracks discovered
  • No drainage options
  • Utilities in way
  • Engineering required
  • Permit complications

What Pros Provide:

  • Proper equipment
  • Drainage expertise
  • Code compliance
  • Warranties
  • Insurance coverage

Cost Justification:

  • Complex drainage saves thousands
  • Proper waterproofing critical
  • Mistakes very expensive
  • Time value significant
  • Peace of mind valuable
Safety Considerations Safety Considerations results

Safety Considerations

Protecting Life and Property

During Installation

  • Never work alone
  • Shore deep excavations
  • Locate utilities first
  • Ladder access ready
  • First aid available

Child Safety

  • Covers mandatory
  • Regular inspection
  • Teach escape routes
  • Practice emergency exit
  • Secure covers properly

Emergency Egress

  • Clear path maintained
  • Regular testing
  • Family escape plan
  • Nothing stored in well
  • Cover opens easily

Winter Concerns

  • Snow load on covers
  • Ice blocking drainage
  • Frozen drains
  • Clear regularly
  • Emergency backup plan

Legal Liability

  • Attractive nuisance laws
  • Secure against entry
  • Regular maintenance documented
  • Insurance notification
  • Code compliance critical
Final Installation Tips Final Installation Tips results

Final Installation Tips

Ensuring Success

Planning Phase

  • Measure three times
  • Get proper permits
  • Order materials early
  • Schedule utilities locate
  • Plan drainage carefully

Installation Phase

  • Follow sequence exactly
  • Test drainage before backfill
  • Document with photos
  • Don’t skip steps
  • Quality over speed

Critical Success Factors

  • Drainage is everything
  • Size for future needs
  • Waterproofing essential
  • Proper attachment critical
  • Code compliance mandatory

Remember:

  • Water always wins
  • Drainage prevents problems
  • Safety comes first
  • Codes exist for reasons
  • Do it right once

Your window well is only as good as its drainage. Focus on water management and everything else falls into place.

Testimonials

What Our Customers Say

4.9/5 Average Rating
2800+ Happy Customers
Lifetime Warranty
FAQ

Frequently Asked Questions

Get answers to common questions about window well installation guide | diy & professional options.

  • Minimum width is window width plus 150mm (6 inches) on each side. Projection from wall should be 400-600mm (16-24 inches) for standard wells, or 760mm (30 inches) minimum for egress wells. Depth should extend 100-150mm below the window sill.
  • Usually yes, especially for egress window wells or if you’re connecting to drainage systems. Check with your local building department. Even if not required, following code requirements protects you legally and ensures safety.
  • Excavate 300mm (12 inches) below window sill level, plus another 450mm (18 inches) for drainage gravel - total depth typically 750mm (30 inches) minimum. This provides adequate drainage capacity and prevents water from reaching the window.
  • No. Ontario Building Code requires positive drainage for all window wells. Options include connecting to weeping tile, running to a sump pump, or installing a French drain system. Wells without drainage will flood.
  • Ladders are mandatory when well depth exceeds 900mm (36 inches) and for all egress window wells regardless of depth. The ladder must be permanent, with rungs maximum 300mm (12 inches) apart.
  • Use clear 3/4 inch (19mm) drainage stone only. Never use crusher run or any material with fines that can clog drainage. You need 450mm (18 inches) of clear stone in the bottom for proper drainage.
  • Ensure positive drainage to weeping tile or sump, use only clear drainage stone, install filter fabric to prevent clogging, grade soil away from well, maintain 2% slope minimum, and keep drains clear of debris.
  • Galvanized steel wells are most common and durable. Composite materials resist rust but cost more. Avoid corrugated steel for permanent installation. Choose based on your budget and aesthetic preferences.
  • Building code requires covers to support minimum 1.9 kPa (40 pounds per square foot). For reference, this handles typical snow loads and prevents falls. Covers must also open easily from inside without tools.
  • Check local bylaws for setback requirements. Most municipalities require window wells to be set back from property lines. Even if allowed, consider neighbor relations and future maintenance access needs.

Ready to Start Your Project?

Get a free inspection and detailed quote. No obligations, just honest advice.