Get Free Estimate

Basement Drainage Complete DIY Guide
Building Code Requirements and Proper Installation

Complete guide to installing basement drainage that meets Ontario Building Code. Learn proper pipe types, slope calculations, gravel specifications, and inspection requirements. Professional-grade instructions for DIY drainage installation.
Basement Drainage Complete DIY Guide in progress
⚠️ Licensed & Insured
⚡ Fast Response
Foundation crack Wall damage Basement leak Structural damage

Why Toronto Homeowners Trust DrySpace

25+ Years in Business
12,847 Projects Completed
$5M Insurance Coverage
24/7 Emergency Response

WSIB Certified

Full workplace safety insurance coverage for all workers

CSA Approved

Canadian Standards Association certified materials & methods

ISO 9001:2015

International quality management system certification

BBB A+ Rating

Better Business Bureau accredited with highest rating

Basement Drainage Complete DIY Guide

Complete guide to installing basement drainage that meets Ontario Building Code. Learn proper pipe types, slope calculations, gravel specifications, and inspection requirements. Professional-grade instructions for DIY drainage installation.

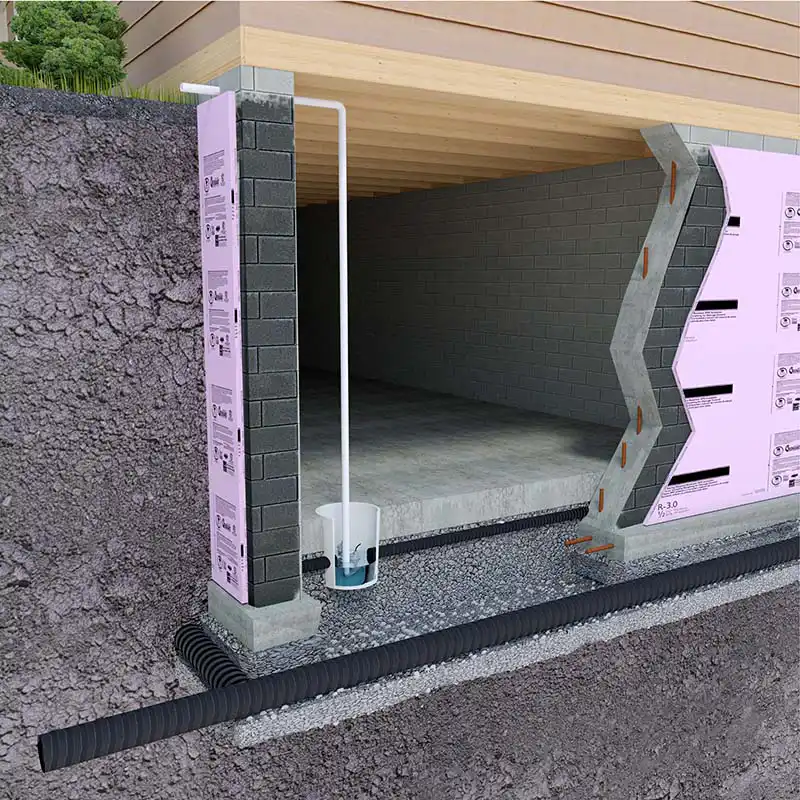
Critical Code Requirements

✓ Minimum 4" diameter pipe
✓ 1% slope minimum (2% recommended)
✓ 6" gravel above and below pipe
✓ Holes face DOWN (not up!)
✓ Purple primer required on PVC

Service Areas

Service Areas: Toronto, North York, Scarborough, Etobicoke, East York, York, Mississauga, Brampton, Vaughan, Richmond Hill, Markham, and surrounding areas.

Drainage is permanent - do it right the first time. When in doubt, consult professionals. The cost of fixing failed drainage far exceeds professional installation.

Related Services

Complete Solutions for Your Basement

Since we're already working on your basement, consider these complementary services that save time and money when done together.

Building Code Requirements and Proper Installation Building Code Requirements and Proper Installation results

Building Code Requirements and Proper Installation

Installing basement drainage isn’t just about keeping water out - it’s about doing it right, meeting code, and passing inspection. Whether you’re adding a bathroom, installing interior waterproofing, or improving existing drainage, this guide covers every requirement, specification, and inspection point you need to know.

Toronto’s building code has specific requirements for basement drainage. Get it wrong and you’ll fail inspection, void insurance, or worse - flood your basement. Get it right and you’ll have a dry, functional basement that adds value to your home.

This guide provides exact specifications, material requirements, and step-by-step installation details that meet or exceed Ontario Building Code requirements.

Ontario Building Code Requirements Ontario Building Code Requirements results

Ontario Building Code Requirements

Minimum Standards for Basement Drainage

Foundation Drainage (OBC 9.14.2.1)

  • Drainage required around all foundations
  • Extends to footing bottom or lower
  • Minimum 100mm (4") diameter pipe
  • Perforated or open joint
  • Connected to sump or sewer (where permitted)

Slope Requirements (OBC 7.4.10.3)

  • Minimum 1% slope (1/8" per foot)
  • 2% preferred for better flow
  • Never exceed 4% (pipe separation)
  • Consistent slope mandatory
  • No dips or bellies allowed

Pipe Coverage (OBC 9.14.3.1)

  • Minimum 150mm (6") gravel below
  • 150mm gravel above pipe
  • Filter fabric required
  • Protects from soil infiltration
  • Maintains flow capacity

Sump Pit Requirements (OBC 9.14.5.2)

  • Minimum 750mm (30") deep
  • 450mm (18") diameter minimum
  • Sealed cover required
  • Vent required if sealed
  • Discharge above grade

Floor Drains (OBC 7.4.5)

  • Connected to sanitary drainage
  • Trap seal required (50mm minimum)
  • Backwater valve if below street
  • Primer required or deep seal
  • Accessible cleanout needed
Types of Drainage Pipes Types of Drainage Pipes results

Types of Drainage Pipes

Choosing the Right Pipe for Your Application

1. PVC Perforated Pipe (Most Common)

  • Sizes: 4" standard, 6" for high volume
  • Perforations: Two rows of holes
  • Installation: Holes face DOWN (not up!)
  • Uses: Foundation drainage, French drains
  • Lifespan: 50+ years

2. Corrugated Flexible Pipe (Big Box Store Special)

  • Pros: Easy to install, cheap
  • Cons: Crushes easily, clogs, not code
  • Verdict: NEVER use for permanent drainage
  • Exception: Temporary surface water only

3. PVC Solid Pipe

  • Uses: Discharge lines, under slabs
  • Sizes: 3" minimum for drainage
  • Benefits: Smooth interior, best flow
  • Required: For all non-perforated sections

4. ABS (Black) Pipe

  • Uses: Interior plumbing drainage
  • Note: Different glue than PVC
  • Code: Approved for sanitary only
  • Cannot: Mix with white PVC

5. Weeping Tile (Clay - Historic)

  • Status: No longer installed
  • Found: Older homes
  • Issues: Breaks, clogs, roots
  • Replace: With modern PVC
Proper Glue and Connections Proper Glue and Connections results

Proper Glue and Connections

The Right Way to Join Pipes

PVC Primer and Cement

  • Primer: Purple, required by code
  • Cement: Medium-bodied for 4" pipe
  • Temperature: Not below 5°C
  • Cure Time: 2 hours before pressure

Proper Gluing Technique:

  1. Cut Square: Use proper PVC cutter
  2. Deburr: Remove all burrs inside/out
  3. Dry Fit: Ensure proper fit first
  4. Clean: Both surfaces with cleaner
  5. Prime: Purple primer on both surfaces
  6. Cement: Apply to both surfaces
  7. Join: Push together with 1/4 turn
  8. Hold: 30 seconds minimum
  9. Wipe: Remove excess immediately

Common Mistakes:

  • No primer (fails inspection)
  • Too much cement (blocks pipe)
  • Not holding (joint fails)
  • Wrong cement (ABS vs PVC)
  • Cold weather application

Mechanical Connections:

  • Fernco couplings for repairs
  • Mission bands for transitions
  • Never underground exterior
  • Accessible locations only
  • Two clamps minimum
Slope Calculations and Installation Slope Calculations and Installation results

Slope Calculations and Installation

Getting the Grade Right

Calculating Proper Slope

1% Minimum (1/8" per foot):

  • 10-foot run = 1.25" drop
  • 20-foot run = 2.5" drop
  • 50-foot run = 6.25" drop

2% Recommended (1/4" per foot):

  • 10-foot run = 2.5" drop
  • 20-foot run = 5" drop
  • 50-foot run = 12.5" drop

How to Establish Slope:

  1. Mark Start Point: Where drain begins
  2. Mark End Point: Calculate drop needed
  3. Snap Chalk Line: Between points
  4. Install Hangers: Every 4 feet
  5. Check Continuously: With 4’ level
  6. Adjust as Needed: Before backfilling

Using a Transit/Laser:

  • Set up level reference
  • Mark pipe stations
  • Calculate drops
  • Transfer to pipe
  • Verify with level

Common Slope Errors:

  • Eyeballing it (always wrong)
  • Inconsistent slope
  • Reverse slope sections
  • Too much slope (>4%)
  • Settling after backfill
Gravel Specifications Gravel Specifications results

Gravel Specifications

The Foundation of Good Drainage

Required Gravel Types

Clear Stone (3/4" or 19mm):

  • Use: Around drainage pipes
  • Why: No fines to clog pipe
  • Amount: 6" below, 6" above
  • Coverage: Full pipe length
  • Cost: More than crusher run

Pea Gravel (10mm):

  • Use: French drain fill
  • Benefits: Good flow rate
  • Note: Can migrate
  • Better: 3/4" clear stone

Crusher Run (Not for Drainage!):

  • Contains: Fines that clog
  • Use: Base material only
  • Never: Around drain pipes
  • Exception: Under slabs

Installation Requirements:

  1. Excavate: To proper depth
  2. Level Base: No sharp rocks
  3. Place Fabric: If required
  4. Add Gravel: 6" minimum base
  5. Level Gravel: To slope needed
  6. Install Pipe: On gravel bed
  7. Cover Pipe: 6" minimum above
  8. Fabric Wrap: Burrito style
  9. Backfill: With appropriate material
Concrete Work for Drains Concrete Work for Drains results

Concrete Work for Drains

Protecting and Finishing Drainage

When Concrete is Required

Floor Drain Installation:

  • Break existing floor minimum 24" square
  • Excavate for trap depth
  • Install drain at proper height
  • Connect to drainage system
  • Pour concrete to match

Sump Pit Installation:

  1. Cut Floor: 24" minimum opening
  2. Excavate: 30" deep minimum
  3. Place Gravel: 6" base
  4. Install Pit: Level and plumb
  5. Backfill: With gravel
  6. Pour Collar: 4" thick minimum
  7. Slope Floor: To pit slightly
  8. Finish: Match existing

Trench Drains:

  • Form to proper width
  • Reinforce with rebar
  • Slope to drain point
  • Smooth finish
  • Seal joints properly

Concrete Mix for Drains:

  • 25 MPa minimum strength
  • 6% air entrainment
  • Low slump (75-100mm)
  • Proper consolidation
  • No segregation
Inspection Requirements Inspection Requirements results

Inspection Requirements

What Inspectors Look For

Rough-In Inspection (Before Covering)

Inspector Checks:

  1. Pipe Size: Meets minimum code
  2. Slope: Consistent and adequate
  3. Joints: Properly glued/connected
  4. Support: Adequate hangers
  5. Materials: Approved types
  6. Venting: Where required
  7. Cleanouts: Accessible locations
  8. Backwater Valves: If required

Common Failures:

  • Wrong slope (too little/much)
  • No primer on joints
  • Mixing pipe types
  • Inadequate support
  • No permit pulled
  • Wrong materials

Final Inspection

Requirements:

  1. Function Test: Water flows properly
  2. No Leaks: All joints dry
  3. Proper Cover: Concrete/gravel
  4. Access: Cleanouts accessible
  5. Grade: Slopes away outside
  6. Documentation: Permits signed

Preparation Tips:

  • Test everything first
  • Clean work area
  • Have permit ready
  • Know your system
  • Be present for inspection
Interior Drainage Systems Interior Drainage Systems results

Interior Drainage Systems

Managing Water Inside Basements

Interior Perimeter Drains

Installation Steps:

  1. Break Floor: 12-16" from wall
  2. Excavate: To footing level
  3. Clean Footing: Remove debris
  4. Install Pipe: Perforated PVC
  5. Connect Sections: Proper slope
  6. Add Gravel: Fill trench
  7. Install Membrane: On walls
  8. Pour Concrete: Match existing

Key Details:

  • Maintain 1% minimum slope
  • Holes face down always
  • Connect to sump properly
  • Include cleanouts
  • Seal floor joint

Common Mistakes:

  • Pipe too high (misses water)
  • No slope (water sits)
  • Holes up (clogs immediately)
  • No cleanouts (maintenance impossible)
  • Poor sump connection
Exterior Drainage Systems Exterior Drainage Systems results

Exterior Drainage Systems

Preventing Water Entry

Foundation Drainage (Weeping Tile)

Proper Installation:

  1. Excavate: To footing bottom
  2. Clean Foundation: Remove soil
  3. Apply Waterproofing: If needed
  4. Install Drainage Mat: Protection layer
  5. Place Filter Fabric: In trench
  6. Add Gravel Base: 6" minimum
  7. Install Pipe: Perforated PVC
  8. Cover with Gravel: 6" above
  9. Wrap Fabric: Burrito style
  10. Backfill Properly: No clay

Critical Points:

  • Never above footing bottom
  • Continuous slope to outlet
  • Proper pipe orientation
  • Quality filter fabric
  • Connect to positive drainage
Backwater Valve Requirements Backwater Valve Requirements results

Backwater Valve Requirements

Protecting Against Sewer Backup

When Required (OBC 7.4.6.4)

  • Any fixture below street level
  • Areas prone to backup
  • City may mandate
  • Insurance may require

Installation Requirements:

  1. Location: Accessible for maintenance
  2. Type: Normally open style
  3. Size: Match drain size
  4. Cover: Removable for service
  5. Extension: To grade if deep

Inspection Points:

  • Proper flow direction
  • Flap operates freely
  • Accessible location
  • Proper installation
  • Maintenance access
Sump Pump Connections Sump Pump Connections results

Sump Pump Connections

Proper Drainage Termination

Discharge Requirements:

  • Never to sanitary sewer
  • Storm sewer if permitted
  • Usually to grade outside
  • 10 feet from foundation minimum
  • Prevent freeze-ups

Installation Details:

  1. Check Valve: Mandatory
  2. Union: For pump service
  3. Discharge Size: 1.5" minimum
  4. Slope: Away from house
  5. Winter Considerations: Freeze protection

Common Code Violations:

  • Connected to floor drain
  • Discharge too close
  • No check valve
  • Undersized pipe
  • Creates icing hazard
Floor Drain Specifications Floor Drain Specifications results

Floor Drain Specifications

Proper Installation Requirements

Code Requirements:

  • 2" minimum trap seal
  • 3" minimum size
  • Trap primer if required
  • Cleanout access
  • Proper venting

Installation Process:

  1. Location: Low point of floor
  2. Excavation: For trap depth
  3. Connection: To sanitary
  4. Support: Proper base
  5. Height: Flush with floor
  6. Slope: Floor to drain

Trap Primer Options:

  • Plumbing fixture activated
  • Laundry discharge
  • Deep seal trap
  • Electronic primer
  • Manual fill
Troubleshooting Drainage Problems Troubleshooting Drainage Problems results

Troubleshooting Drainage Problems

Common Issues and Solutions

No Flow/Slow Drainage:

  • Check slope (most common)
  • Look for bellies/dips
  • Verify pipe size
  • Clear obstructions
  • Inspect connections

Water Bypassing System:

  • Pipe too high
  • Gravel contaminated
  • Fabric clogged
  • Improper installation
  • System overwhelmed

Backup Issues:

  • Outlet blocked
  • Negative slope
  • Undersized pipe
  • No cleanouts
  • Root intrusion
Material Shopping List Material Shopping List results

Material Shopping List

What You Need for DIY Drainage

Basic Interior System (100 linear feet):

  • 4" perforated PVC: 100 feet
  • 4" solid PVC: 20 feet
  • 4" elbows: 8-10
  • 4" couplings: 20
  • PVC primer: 1 can
  • PVC cement: 1 can
  • Filter fabric: 300 sq ft
  • 3/4" clear stone: 8 yards
  • Sump pit: 1
  • Sump pump: 1

Tools Required:

  • PVC cutter or saw
  • 4’ level
  • String line
  • Measuring tape
  • Gloves and safety glasses
  • Wheelbarrow
  • Shovels

Don’t Forget:

  • Building permit
  • Inspection scheduling
  • Utility locates
  • Disposal plan
  • Help for concrete
DIY vs Professional DIY vs Professional results

DIY vs Professional

Honest Assessment

DIY Suitable:

  • Simple drain additions
  • Short runs
  • Above-grade work
  • Minor repairs
  • Good physical condition

Hire Professional:

  • Full perimeter systems
  • Under-pinning drainage
  • Complex connections
  • Permit navigation
  • Physical limitations

Hidden Costs of DIY:

  • Tool rental/purchase
  • Material delivery
  • Disposal fees
  • Time value
  • Mistake corrections
  • Inspection failures

Why Pros Are Often Worth It:

  • Experience prevents mistakes
  • Proper equipment
  • Permit knowledge
  • Inspection relationships
  • Warranties included
  • Insurance if problems
Final Tips for Success Final Tips for Success results

Final Tips for Success

Ensuring Your Drainage Works

Planning Phase:

  • Get proper permits
  • Call utility locates
  • Plan entire system
  • Order extra materials
  • Schedule inspections

Installation Phase:

  • Never rush drainage
  • Check slope constantly
  • Test before covering
  • Document with photos
  • Keep permit on site

After Installation:

  • Test thoroughly
  • Get final inspection
  • Keep documentation
  • Plan maintenance
  • Monitor performance

Remember:

  • Water always wins
  • Slope is critical
  • Code exists for reasons
  • Inspections protect you
  • Quality materials matter
Testimonials

What Our Customers Say

4.9/5 Average Rating
2800+ Happy Customers
Lifetime Warranty
FAQ

Frequently Asked Questions

Get answers to common questions about basement drainage complete diy guide.

  • Ontario Building Code requires minimum 1% slope (1/8 inch per foot), but 2% (1/4 inch per foot) is recommended for better flow. Never exceed 4% slope as pipes can separate. Consistent slope throughout the entire run is critical.
  • Holes MUST face DOWN, not up. This is the most common DIY mistake. Water enters through the gravel bed below, not from above. Holes facing up will clog immediately with sediment. Position pipes with two rows of holes at 4 and 8 o’clock.
  • No. Corrugated flexible pipe is not code-compliant for permanent basement drainage. It crushes easily, clogs frequently, and has poor flow rates. Use only rigid PVC pipe - 4 inch perforated for drainage, solid for discharge lines.
  • Use 3/4 inch (19mm) clear stone only. Never use crusher run or any gravel with fines - they’ll clog your system. You need 6 inches of clear stone below the pipe and 6 inches above. This is not the place to save money.
  • Yes, most drainage work requires a plumbing permit. This includes new floor drains, sump pit installation, and perimeter drainage systems. Permits ensure code compliance and protect you during resale. Work without permits may void insurance.
  • Drainage pipes should enter the sump pit through properly sized holes cut 4-6 inches below the rim. Maintain slope right to the pit. Use rubber grommets to seal penetrations. Never connect drainage directly to the pump.
  • Inspectors check: proper pipe size (4 inch minimum), consistent slope (1% minimum), purple primer on all PVC joints, approved materials, proper support, accessible cleanouts, and backwater valves where required. Test your system before inspection.
  • No, this is illegal. Sump pumps cannot discharge to sanitary sewers. They must discharge outside, 10 feet minimum from foundation, or to storm sewers where permitted. Connecting to floor drains can cause sewage backups and hefty fines.
  • Interior drains must be installed at or slightly below the footing bottom to capture water before it enters under the slab. This typically means 12-16 inches below basement floor level. Installing too shallow misses water.
  • Backwater valves are required for any fixture below street level or in areas prone to sewer backup. This includes most basement floor drains and plumbing fixtures. They prevent sewage from backing up into your basement during heavy rains.

Ready to Start Your Project?

Get a free inspection and detailed quote. No obligations, just honest advice.